
Tuesday, August 30, 2011
Tuesday Tutorial ♥
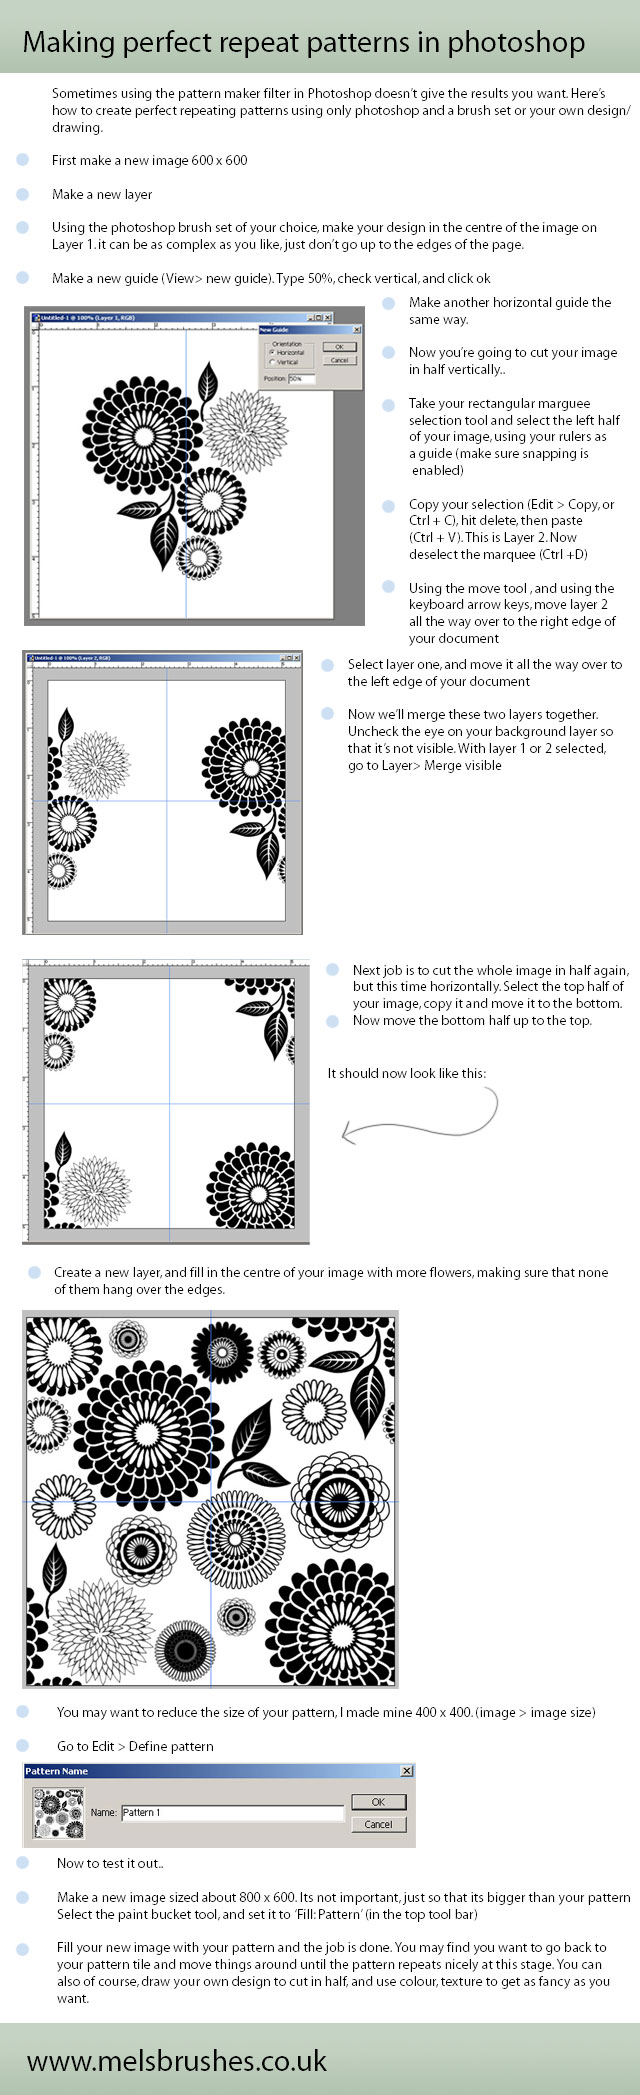
Here it is, again! I am loving this week's tutorial. So I know this is kind of a knitting blog, but being overall crafty and designery myself, I thought I'd share something, again, that's not about knitting. I've been designing a LOT this week as I got my Etsy store up and running (yay!), so I'm quite in design-mode these days. Here is a really great tutorial for creating your own repeating patterns in Photoshop. Will be using this one a TON. Enjoy! I promise to post some knitting related items soon. Maybe even later today I'll show you the things I've finished recently and what's on my needles now. Yes, I think it's time for another of those posts. In the meantime, have fun creating some great patterns.
Foxy shoes
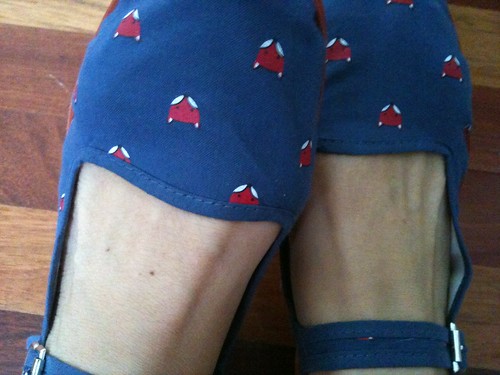
So, Tuesday Tutorial to come later, but I had to share my new foxy shoes :) Yay!!
(from urban outfitters)
Wednesday, August 24, 2011
aMAZing site "Closet Visit" - so inspiring!
SO, here's my new favorite fashion site. I don't look at a ton of fashion sites, but lately I've gotten into Polyvore.com and THIS ONE: http://cargocollective.com/closetvisit. Oh my it's beautiful and such a great idea. I may do a little closet visit of my own and photograph some of my favorite items :)


Tuesday, August 23, 2011
Tuesday Tutorial ♥
Hello!! Happy Tuesday. I am sitting here with a bum ankle...I must have strained it while doing my run yesterday :( ... But being less mobile makes A) more time for knitting! B) less of a guilty feeling for not finishing up the laundry and C) for a great time to catch up on all of my many unread blog posts in my Bloglovin account. So now that I'm caught up on those and had a little time to peruse my Pinterest pins, I'm here to share a fun tutorial that I'm about to go round up the supplies to make for myself, after this post! Of course I'll have to wait until night time to test it out, but I have plenty of fairy lights/Christmas lights around at home to practice on :)
Check out these lovely images first:


I found these and a link to a tutorial for making a 'bokeh' here, on one of my favorite blogs, Le Fru Fru. It's in Italian (which I'm learning, but not good at ALL yet because I keep knitting instead of doing the Rosetta Stone lessons), but your browser will most likely translate it if needed. The tutorial on Green Laundry is in English though, so that will be helpful :)
A 'bokeh' is "the blur, or the aesthetic quality of the blur, in out-of-focus areas of an image, or "the way the lens renders out-of-focus points of light.(from Wikipedia) In this particular instance, we can create the heart-shaped 'bokeh' through making a lens cover, like this (image from Green Laundry's blog):
Check out these lovely images first:
A 'bokeh' is "the blur, or the aesthetic quality of the blur, in out-of-focus areas of an image, or "the way the lens renders out-of-focus points of light.(from Wikipedia) In this particular instance, we can create the heart-shaped 'bokeh' through making a lens cover, like this (image from Green Laundry's blog):
I hope you'll go try this out! Again, the link to the tutorial is here. I'm excited to try this and experiment with more night time photography. Have fun and share pictures if you try this out!!
Friday, August 19, 2011
work it out
So, I just realized I missed the Tuesday Tutorial this week. I'll admit I was enjoying myself out in Oregon wine country with my husband and parents. What an amazingly beautiful area. WOW! And so close to our new home. I have a feeling we will be taking many trips out there. Here is a shot from the Willamette Valley.
My reason for posting today though is to let you know what I've been up to for 3 weeks now, workout-wise. I'm doing the Couch to 5K training program that I found online. The running club where we used to live offers this training 2x a year and I had heard about it before. I have to say I wasn't excited about starting to run again. It's been a long time since I chose that as my main form of exercise. I fell in love with Zumba and hula hooping over the past few years because they were much more interesting and held my attention. BUT...I am loving this training so far! I'm not necessarily training to run IN a 5k, but knowing I will be able to run 3 miles, 3x a week at the end of this is pretty cool.
If you'd like to check it out, I've created a better document of the training program here: Couch to 5K
I, of course, did not come up with this. I'm not sure who did, but when I found it online it was hard to follow, so I did a nicer layout that I think will be easier to read for you :) I posted mine above my desk! Be sure to workout only every other day to give time for your body to rest and heal in between runs.
As for a workout playlist, I thought I'd share a few fun songs I'm running to right now. If you have additional suggestions though I'm always looking for new music with a good beat. Enjoy!
-"Born this Way" - Lady Gaga
- pretty much anything from Foster the People - Houdini, Pumped Up Kicks, Call It What You Want
- Michael Jackson songs, FOR SURE - If You Wanna Be Startin' Somethin' is my favorite
- "She Wolf" - Shakira
- "Mo Money Mo Problems" - Notorious B.I.G. - a classic :)
- "Canned Heat" - Jamiroquai
- "Boom Boom Pow" - Black Eyed Peas
- "My Chick Bad" - Ludacris
Saturday, August 13, 2011
Tips for Photographing Your Knits
On this gray Saturday afternoon, while waiting to go to dinner with my parents who just arrived to town, I was perusing Ravelry, spying on various lovely hand knits (& crochets!) There is one thing that saddens me as I look through many lovely projects on Ravelry...so many talented knitters do not know how to photograph their projects! Trust me, I understand the desire to just get a photo up on Ravelry so you don't have the awful blank white square staring at you from your projects list. I am guilty of having some not so great photos of my knits up there and will show you some examples of my wrong-doing, but I'd also like to offer a few tips and examples of how to make your hard work really shine through on your project pages. I am a graphic designer, but I am NOT a photographer. You don't have to be to take better quality photos if you consider a few things. Here are some things to consider and you DON'T have to have a fancy camera. My husband has one that I occasionally use, but I mostly use my regular digital camera or my iPhone.
1. NATURAL LIGHT
Regardless of what else you consider when photographing your knits, natural light will always show off the colors and stitch definition best. It's REALLY tough to wait until daylight when you finish that great sweater you've been working on feverishly, but if you'll look at photos that you love and that are really spectacular, you'll notice they are generally photographed outside or by a window. (Sometimes you can't tell they are by a window, but if you start looking, you'll see the difference between a photo taken with a camera flash vs. one that wasn't).

2. BACKGROUND
When I photograph my knits I try to consider an interesting background that won't compete with the knitting. Sometimes I like to have a pattern or piece of artwork that is near me, sometimes I like to have a very simple background, like a solid wall in my home. It just depends on the piece, how much detail it has, and what I think will compliment it. Please just consider something that you would want people to see versus some dirty dish lying on your coffee table or a cat hair/dog hair ridden chair. You have worked hard on this piece! Show it some respect and hide the messiness of your house from the photo. I'm not telling you to become a neat freak, just pretend for this one photo that you are one :)

3. DISPLAY
Remember that most knits are 3D shapes and look droopy or floppy when not filled with a similar shape as the body part it's made for. A dress form is of course nicest when photographing shawls, sweaters, etc. I don't have one either, so don't worry. Consider using some tissue paper or small towels, etc. to stuff your knit (ie. for a hat or baby items) before your photograph it. Or, lay it out nicely, fold it nicely and again, consider what will be in the background of your knit. Sometimes I make my dog wear things. While fun, this is probably not the most professional look you can get, but hey, if they'll sit still long enough to give the item some shape, at least you're 'considering' the shot.
If you do have a sweater or other clothing item to photograph and you want to put it on in which to do so (makes sense, especially if it's for you!), think about your outfit and the styling of it as you go to put on your new product. Will anything else show in the photos? Would it compliment the sweater or cardigan to wear a leather belt to show off the shape? Would wearing shoes really accentuate the style of the knee socks? You can always take some photos with your other clothing props and some without, so people can see details that might be hidden by the accessories. But we all know what a toe of a sock looks like, right? Mix it up a little and have fun with styling yourself and your new item of clothing.

4. COMPOSITION
This is a basic design fundamental and it has some to do with the background tip stated earlier, but it mostly has to do with how you position the item being photographed within the frame of the picture. Think about interesting angles and filling up the photo as much as possible with your knit. Don't be too far away from it so people have to search for what you want them to focus on. The great thing about digital cameras is that you can take as many photos as you want, choose the best, and delete the rest. So don't be afraid to try a bunch of angles, getting closer in and farther away, etc. You can't go wrong, but you can have fun finding your favorite angle for that piece. You can also easily crop your photos once you get them onto the computer if you need to. Again, consider these tips for composition as you crop. You will be amazed at the difference it makes!

**Please let's have a minute to focus on socks here. If at all possible, find someone to photograph them for you if you want to wear them in the shot. A shot of your feet from your perspective A) is not flattering and B) doesn't usually show off the loveliness of the design or pattern you've worked so hard to create. Let's have well-shot socks!!
In conclusion, I will be the first to tell you that not all of my photos on Ravelry are great, professional looking shots. Those early ones are somewhat atrocious! I have been learning as I go over the last 8 years of knitting and 4 years of being on Ravelry. What I am saying is that you might as well consider some good practices when taking pictures of your hard work. You want to really make it shine and stand out among the rest, right? You're proud of the time and effort you put into making your piece and that should show through your photograph. Again, you don't need spectacular equipment, just some forethought to get really great pictures. I hope you'll consider these and have fun with it!
Thursday, August 11, 2011
Today's project inspired by Ikea
As we're getting settled into the house, we've made MANY trips to Ikea to get various small furniture items. I have become somewhat of a master at putting these things together. It's actually been pretty fun. Yesterday I bought a small comfy chair for the craft room that turns into a twin size futon bed. Amazing.
So, you get all of your instructions and hardware for each project and there's ALWAYS one of those little allen wrenches. I knew I had collected a few of these in the last few weeks and wanted to find a way to use them all (besides in the obvious manner, to screw in bolts). I got some lovely suggestions on Facebook from my friends for mobiles, Christmas ornaments, etc. I thought about making a cool necklace, but then I remembered our wind chime we had in Nashville broke and I knew exactly what I'd make with these lovely metal pieces. I held them on some wire and they sounded beautiful when they clinked together!
So, I gathered up some jewelry making supplies and part of a mason jar lid and got to work. I'm so happy with how it turned out! It took a bit of working to get everything right, but now I have a use for these allen wrenches that we will enjoy on the patio. Hooray for not throwing something away! :)
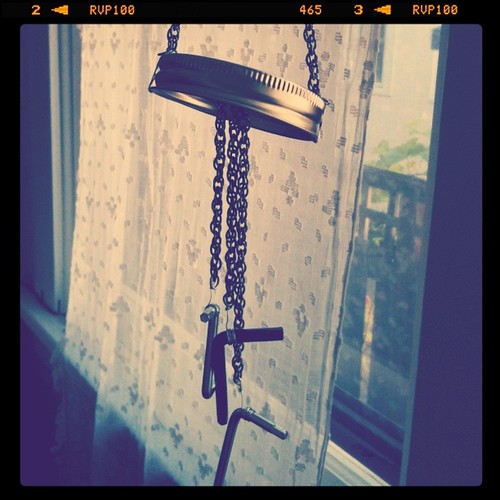
Tuesday, August 9, 2011
my new addiction
Well, it seems tonight I'm full of ideas I want to share with you. I'd like to let you in on my newest favorite treat. I have rediscovered my love for hot tea and recently got two amazingly scrumptious black teas. The first one I got was from a local tea shop I found called Townshend's Tea Company. Luckily, they are just up the street from me! AND they are super close to a lovely yarn shop and a cute fabric store. I am a lucky girl. From them I purchased Creme de la Earl Gray. OMG it is delightful. In fact my brewing timer just went off and a cup of it is ready! I add a tiny bit of sugar and some milk.

The second kind I'm loving is called Moon Over Madagascar that I ordered from Tea Source. It has Bourbon vanilla from Madagascar in the blend! Mmmmm. I drink it the same way, a bit of sugar and some milk. Both of these smell amazing in addition to their taste. If you love a cup of tea at a time, I would highly recommend getting one of these amazing Gravity Teapots. I have loved mine so much! No more fumbling with a fussy tea strainer or tea ball. This is so nice and easy and fits right over most cups. (It won't fit over giant coffee mugs though, I have found out. But it easily fits over the cute teacups I've gotten from places like Anthropologie :)

If you like rich, black teas you'll love these two. I should probably not drink it before bedtime, but I can't get enough! Morning and night for me right now. It's kind of a nice dessert or accompaniment to one. And just like chocolate, tea always makes everything better, right?
Keep Calm & Carry On...
xo
Laura
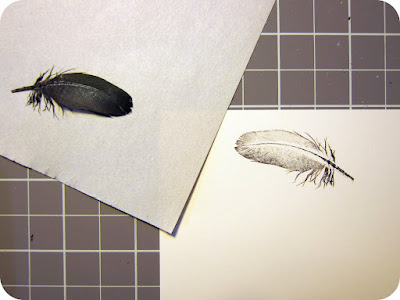
Tuesday tutorial. hey, look, I remembered!
Sooooo, I just happened to remember I promised a Tuesday Tutorial each week. Whew. It's still Tuesday :) I have been finding many wonderful tutorials on crafty, home, knitting, and sewing projects on Pinterest. Let me share a lovely one with you tonight! I haven't done this yet, but I'm dying to, once I get the craft room a little more in order.
Feather stamping. Isn't it beautiful?! So clever and simple. And you only need a few supplies you probably have already. Gorgeous. I can't wait to try it.

Click here for the full tutorial. Enjoy! Let me know if you try it out as I would love to hear and see pictures of what you make!
Feather stamping. Isn't it beautiful?! So clever and simple. And you only need a few supplies you probably have already. Gorgeous. I can't wait to try it.
Click here for the full tutorial. Enjoy! Let me know if you try it out as I would love to hear and see pictures of what you make!
Saturday, August 6, 2011
first foray into reupholstering
So, instead of unpacking the remaining boxes in our house, I decided to give myself a new project. :) My grandmother gave me this beautiful chair years ago, along with a tapestry type fabric and a staple gun to someday recover it. Well, I never got around to it and the tapestry fabric is not quite my style anymore. I'm trying to setup our living room in the new place and am transitioning away from a few of the colors we used in the previous house and am adding new patterns and natural elements to the decor. To give you an idea, here is my inspiration board for the room:

Most of the items are things we already had...the couch, the artwork, etc. We bought the rug at Ikea and then I made this in order to pick out some fabric for the chair and pillows. I originally thought I'd use a yellow and white chevron print fabric to cover the chair. But once I ordered that and put it in the room it seemed too summery. I might still do something with it in there, but I'm not sure. The yellow is brighter than that on the pillow with rosettes. I think that's why it didn't work.
But thankfully I also ordered the lovely ivory and brown Ikat fabric pictured. I have yet to order the more damask Ikat print in gray. We'll see if I find a use for that, but I will need to tie in the gray rug in some way. I put the brown and ivory fabric on the barrel chair and it looked great! So I began my first try at recovering a chair. Her is the chair before:

Here is the chair after I (slowly and painstakingly) removed the staples and carefully removed the old fabric and padding:

This chair was kind of tough for a first foray into reupholstering, but after using the old fabric as sort of a template, pulling, prodding and stapling, here is the new, improved chair!
 I really like how it turned out. I am going to add some trim around the front and back legs (they were super tough!). I really love this fabric. I think it will last a long time and through many colors and styles. Here is a closeup of the fabric:
 And here is a shot of our little setup in the living room by the window. It always takes a lot of time and effort to get your old stuff situated in a new place. The setup of every room is this house is already very different from our old place. I'm enjoying it, but it does take a lot of time.

I have started discovering more of my style through this process though. I really love to focus on cool artwork, many natural colors with just a few accessories & the artwork bringing in brighter colors. I love mixing new artwork with older furniture and vintage finds. The only thing I'm still working on is how to bring in some Aztec/southwest patterns into our current style. That may take a bit of reworking at some point, but I'm loving where the decor is going. Even though our sofa is sort of newish I now wish I had gotten more of a neutral linen fabric instead of the olive-y green chenille. Oh well! That always happens and you can't just go around buying a new sofa all the time!
I hope you'll try recovering a piece of furniture. My thinking throughout the process was, well this is for myself and I'm not selling it or doing this for a client. That got me over the frustration and fear a little bit of taking on this task. You'll be happy updating a piece to fit your current decor and you can generally find pieces with great structure for really cheap at garage sales. Just search online for tips and instructions and enjoy a 'new' piece of furniture for less!! Tomorrow it's repainting the living room for me. I just can't live with the lavender walls that are in there anymore!! Happy Weekend!

Most of the items are things we already had...the couch, the artwork, etc. We bought the rug at Ikea and then I made this in order to pick out some fabric for the chair and pillows. I originally thought I'd use a yellow and white chevron print fabric to cover the chair. But once I ordered that and put it in the room it seemed too summery. I might still do something with it in there, but I'm not sure. The yellow is brighter than that on the pillow with rosettes. I think that's why it didn't work.
But thankfully I also ordered the lovely ivory and brown Ikat fabric pictured. I have yet to order the more damask Ikat print in gray. We'll see if I find a use for that, but I will need to tie in the gray rug in some way. I put the brown and ivory fabric on the barrel chair and it looked great! So I began my first try at recovering a chair. Her is the chair before:

Here is the chair after I (slowly and painstakingly) removed the staples and carefully removed the old fabric and padding:

This chair was kind of tough for a first foray into reupholstering, but after using the old fabric as sort of a template, pulling, prodding and stapling, here is the new, improved chair!


I have started discovering more of my style through this process though. I really love to focus on cool artwork, many natural colors with just a few accessories & the artwork bringing in brighter colors. I love mixing new artwork with older furniture and vintage finds. The only thing I'm still working on is how to bring in some Aztec/southwest patterns into our current style. That may take a bit of reworking at some point, but I'm loving where the decor is going. Even though our sofa is sort of newish I now wish I had gotten more of a neutral linen fabric instead of the olive-y green chenille. Oh well! That always happens and you can't just go around buying a new sofa all the time!
I hope you'll try recovering a piece of furniture. My thinking throughout the process was, well this is for myself and I'm not selling it or doing this for a client. That got me over the frustration and fear a little bit of taking on this task. You'll be happy updating a piece to fit your current decor and you can generally find pieces with great structure for really cheap at garage sales. Just search online for tips and instructions and enjoy a 'new' piece of furniture for less!! Tomorrow it's repainting the living room for me. I just can't live with the lavender walls that are in there anymore!! Happy Weekend!
Tuesday, August 2, 2011
amazing Asian dressing recipe
Oh my goodness. I just made some dressing for our salad tonight based on this Bobby Flay recipe. I WILL be making the full recipe sometime because this dressing is to DIE for. I die. It's seriously taking lots of will power not to go eat it all before our grilled pork chops are done. Here is how I slightly changed it to be a salad dressing instead of the chicken salad sauce.

This is literally one of the best dressings I've had. I'm serving it over a salad of lettuce, raw broccoli and some chopped peanuts. Mmmmmm!!
Ingredients
- 1/4 cup rice wine vinegar
- 2 tablespoons smooth peanut butter
- 1 tablespoon chopped fresh ginger
- 1 teaspoon Sriracha - I subbed Sriracha b/c we didn't have the chipotle puree and put only 1 tsp.
- 1 tablespoon soy sauce
- 1 tablespoon honey
- 2 teaspoons toasted sesame oil
- 1/8 cup safflower oil - I used a lot less oil because we didn't need much dressing & to cut on fat
- Salt and freshly ground pepper

This is literally one of the best dressings I've had. I'm serving it over a salad of lettuce, raw broccoli and some chopped peanuts. Mmmmmm!!
Tuesday tutorial!
Well, I am going to do my best at presenting a lovely tutorial every Tuesday. I find so many great craft and design project tutorials online that I might as well share them with you! I'll do my best to actually create the items in the tutorial, but mostly it's going to be used to share all of these projects that are built up in my Pinterest account.
So, while I try to claim to be a great graphic designer, I don't claim to be a great photo retoucher. It takes a different set of skills and while I use Photoshop a lot I focus mainly on design and less on editing photos besides general cutting out, a bit of light and skin softening, etc. So I'm always on the lookout for great tutorials on giving nice soft touches to photos. I'm sometimes a step-by-step girl when it comes to things I don't know how to do and I love this tutorial I found today on adding a lovely yellow softness and contrast to a photo. I thought I would share!
Before photo: (you might recognize this from my previous dress revitalized post!)

And the after photo. Much more interesting, don't you think? I am definitely addicted to the Instagram app for iPhone. I LOVE it and you can add pretty filters at the touch of a button, but being designery I sure like knowing how to recreate them myself since I have the right tools.

For the Photo tutorial click here
Enjoy!! Happy Tuesday tutorial :)
Subscribe to:
Posts (Atom)


