
As we're getting settled into the house, we've made MANY trips to Ikea to get various small furniture items. I have become somewhat of a master at putting these things together. It's actually been pretty fun. Yesterday I bought a small comfy chair for the craft room that turns into a twin size futon bed. Amazing.
So, you get all of your instructions and hardware for each project and there's ALWAYS one of those little allen wrenches. I knew I had collected a few of these in the last few weeks and wanted to find a way to use them all (besides in the obvious manner, to screw in bolts). I got some lovely suggestions on Facebook from my friends for mobiles, Christmas ornaments, etc. I thought about making a cool necklace, but then I remembered our wind chime we had in Nashville broke and I knew exactly what I'd make with these lovely metal pieces. I held them on some wire and they sounded beautiful when they clinked together!
So, I gathered up some jewelry making supplies and part of a mason jar lid and got to work. I'm so happy with how it turned out! It took a bit of working to get everything right, but now I have a use for these allen wrenches that we will enjoy on the patio. Hooray for not throwing something away! :)
Showing posts with label craft. Show all posts
Showing posts with label craft. Show all posts
Thursday, August 11, 2011

Tuesday, August 9, 2011
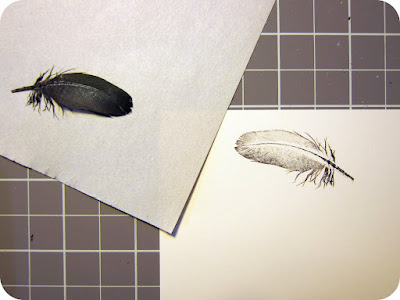
Tuesday tutorial. hey, look, I remembered!
Sooooo, I just happened to remember I promised a Tuesday Tutorial each week. Whew. It's still Tuesday :) I have been finding many wonderful tutorials on crafty, home, knitting, and sewing projects on Pinterest. Let me share a lovely one with you tonight! I haven't done this yet, but I'm dying to, once I get the craft room a little more in order.
Feather stamping. Isn't it beautiful?! So clever and simple. And you only need a few supplies you probably have already. Gorgeous. I can't wait to try it.

Click here for the full tutorial. Enjoy! Let me know if you try it out as I would love to hear and see pictures of what you make!
Feather stamping. Isn't it beautiful?! So clever and simple. And you only need a few supplies you probably have already. Gorgeous. I can't wait to try it.
Click here for the full tutorial. Enjoy! Let me know if you try it out as I would love to hear and see pictures of what you make!
Thursday, April 21, 2011
Tribute to Nashville

This is my tribute to Nashville. I designed it and stitched it. I will always love my Nashville, TN. ♥
Monday, April 18, 2011
posh pillows!! ♥
Here is a GREAT crafty project that will make your house even more lovely and will give you tons of crafty satisfaction! My goal this week was to buy pillowcases and make these, but lo and behold, I found CUTE fabric the other day and actually made my own!


That is a nifty pillow. I made 2 of them and need to crochet the edge on the second one, but I couldn't be happier with how they look on the bed. We needed some more color and now they give me a great color scheme to work from for the bedroom.


This is from a wonderful tutorial I found online a while ago. I rediscovered it last week and just HAD to make some for myself. I'm very proud of myself for sewing these nifty pillowcases. They are quite posh because not only are they made of cute fabric with a cute crocheted edging, but they have a little pocket inside to hide the side of the pillow! See:


Some tips when making these:
1) take your time cutting the fabric and use a rotary cutter if you have one. I don't have a large self-healing mat to cut on, but even so, the rotary cutter gave me such a better cut than the first piece I cut by hand. Seriously. I cannot cut a straight line, as crafty as I am. Ugh.
2) I might suggest using a yarn for the edging that has a bit of nylon, silk, bamboo or something a bit sturdier than just 100% cotton. It turned out just fine, but after having to pull the cotton yarn through a bunch of times to do the blanket stitch foundation for the crochet, the yarn got a little bit worn looking at the end. Not a huge deal, but something with an additional fiber in it will probably hold up better. Be sure to use something machine washable though to make your life easier. You don't want to have to hand wash pillow cases.

3) Iron, iron your seams, etc. It really does help as you're sewing. If you're a pro, you know this. I'm not a pro, but I realized how much it helps.
4) The original post says to give yourself some chocolates while you work to reward yourself. I think that's a good idea, but I did not because with my luck, I'd get the chocolate all over my lovely new fabric.
I hope you'll make some of these! Here is the tutorial here. Have fun and let me know if you make some! I'd love to see your pictures ♥
Thursday, May 27, 2010
Oops...
Apparently I haven't blogged about my finished crocheted baby blanket yet! I thought I had. Again, I've already posted pictures on flickr and Facebook, but I would love to have them here on my blog as well. Sally already received the blanket and I think she was very excited and happy :) I'm so pleased with the finished product and it really was so much fun to work on. Thanks again to Lucy of Attic24 for creating the original, the inspiration for this one. Her blog is SO lovely...please check it out if you haven't already. Currently, she has me really really wanting a caravan of my own to decorate and take on weekend camping trips. I'm a bit obsessed. I think Pinky is tired of hearing about it. Think I can add a caravan to our wedding registry?? ;)


Subscribe to:
Posts (Atom)


